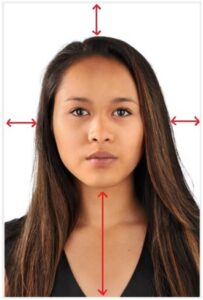
Applicants are no longer required to purchase a Passport photo. We now accept a digital image taken from a suitable camera device. See sample photo below.
As per NZ Dept. of Internal Affairs’ acceptable photo standards, please ensure images adhere to the following criteria below (photos must be in colour, and less than 6 months old. Selfies are NOT accepted):
Summary
- Increase your camera capture settings to at least 3 Megapixel (preferably higher)
- Turn OFF the camera flash (this causes lens reflection and shadows)
- Ensure there is NO reflection appearing in the lens of subject’s glasses
- Ensure there is even lighting in “front” of the subject (lighting on the side will cause dark shadows in the face)
- Turn OFF HEIC format as it is not compatible with our software (change camera setting to JPG, JPEG instead)
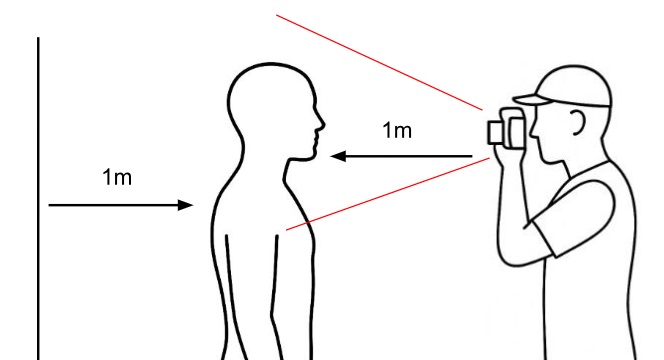
- Have the subject stand at least 1 metre (or further) away from the wall or background (to enable background removal)
- Use only the back camera of your device (front camera selfies are not accceptable)
- See in-depth details below….
Notes:
- DO NOT supply a photograph of another photo or paper print.
- DO NOT supply your favourite Facebook or Social Media photo from 2+ years ago.
- DO NOT supply an old photo (unless it was taken within 6 months and is of suitable passport quality)
- DO NOT alter the digital photo – we will make any necessary adjustments.
- Before you start, please check/adjust the settings on your camera device:
- Adjust your camera app settings to capture photos of at least 3 Megapixels (MP) quality. The higher, the better.
- Ensure the output file format is set to JPG or JPEG (HEIC files are not compatible with our ID software. Many modern phones default to HEIC high-compression format to save memory):
- learn how to change your camera file settings here: HEIC to JPG
- Turn OFF the electronic flash.
- Have the subject stand at least 1 metre away from the wall, or other background.
- Have an assistant take your photo using the back camera of the device:
- DO NOT take selfies: a front camera has a wide-angle lens, unsuitable for close up photography (i.e. facial photography will appear distorted).
- Do not aim the camera into direct light. This results in a darker image (i.e. the camera attempts to compensate for the backlighting).
- The subject’s facial expression should be neutral.
- Have the subject face the direction of natural light.
- Have the subject remove any tinted (or thick-framed) glasses.
- Note 1: reflections in the lens is unacceptable as this obscures the subject’s eyes.
- Note 2: non-tinted, thin-framed glasses are acceptable.
- Note 3: if the subject wears prescription glasses during the course of their duties, please supply a photo wearing these glasses (with no reflection in the lens).
- Have the subject remove any hats, hoods, headbands or head coverings (unless worn daily for religious or medical reasons).
- Have the subject look directly at the camera lens.
- Have the camera operator stand approximately 1 metre away from the subject to take a Head & Chest photo (allow suitable clearance around the subject – see sample photo below).
- Note 3: photos taken too close (i.e. no clearance) cannot be cropped for the ID card software.
- Note 4: photos taken too far away from the subject are unsuitable for reproduction (i.e. results in blur when enhanced).
- Hold the camera at eye level.
- Take the photo in Colour (black and white is unacceptable).
- The AVP must send the original digital image file (e.g. jpg file on your device) to CPNZ.
- Please DO NOT alter the original photo – we will make any necessary adjustments.
Notes:
- We often receive unsuitable photos. Usually because:
- the patrol AVP has not understood our new photo requirements.
- the applicant has not received our photo instructions, or misunderstood our new requirements.
- Where possible, CPNZ prefers the AVP take a digital photo of the applicant at time of the interview (unless the applicant is capable of supplying one to our specifications).
- Digital photos should be of similar quality for a Passport application. If in doubt, refer to the Online Photo Checker. However, we can usually modify most photos.
- We require the original photo file taken from the device (we do not accept copies of paper photos).
- Please DO NOT alter the original photo – we will make any necessary adjustments.
Reasons for rejected photos:
- Face is too dark
- Reflection in the lens of prescription glasses (obscuring subject’s eyes)
- Photo taken too close (unable to crop).
- Photo taken too far away (poor quality image after enhancing)
- Photo is in an unrecognisable format (should be jpg, jpeg, png etc). NB: The software cannot open HEIC.
- Text (or other object) obscuring head/neck area
- Paper prints are no longer accepted
Photo taken 1 metre from subject (please allow sufficient room around the subject for further cropping).
Recent Comments